
Check out this extra thick and cosy, men’s reversible chunky cowl for ultimate warmth this winter. It’s very easy to make using a combination of simple stitches.
Recently, I had to panic make a gift for my partner, who at the last minute told me he wanted a reversible chunky cowl for Christmas after seeing so many snuggly ones in the shops. Game on.
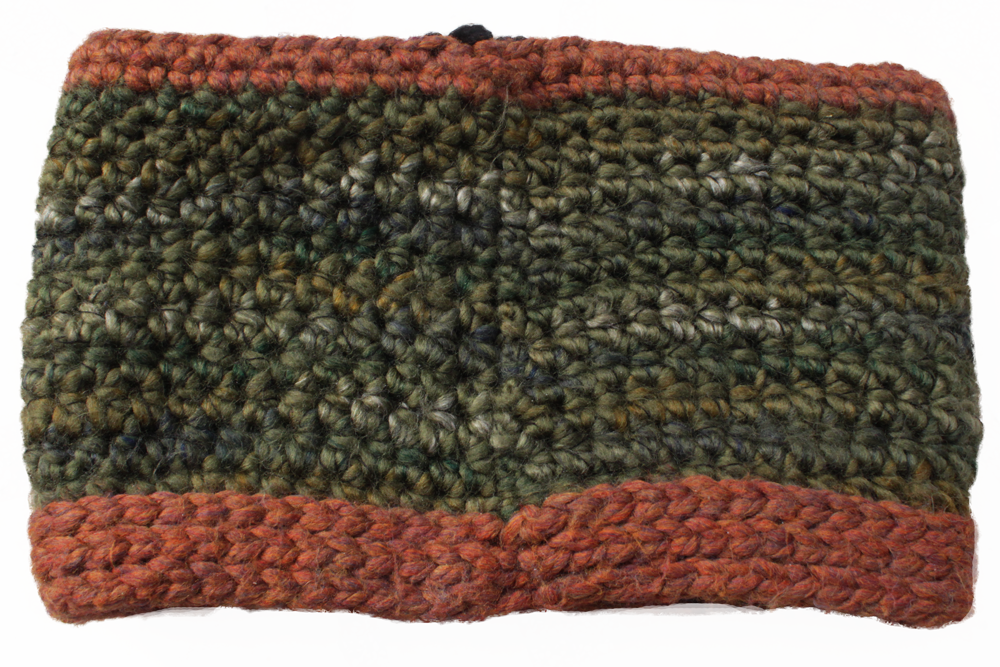
I knew this needed to be really thick so firstly, I decided that the best approach would be to crochet in rounds, making one long tube shape approx. 16” (40cm long) and then fold it in half.
BACK OF REVERSIBLE CHUNKY COWL (WITH SEAM)
INSIDE OF REVERISIBLE CHUNKY COWL

The reversible chunky cowl uses a combination of three different stitches (all UK TERMS):
- ribbing
- half treble crochet
- double crochet
And a combination of three different colours, carefully aligned so that it looks nice when it’s reversed.
This chunky cowl begins with three rows of ribbing stitch (that are closed together to form a circle.) Then the rest of the project is worked above the ribbing, working in closed rounds.
Most importantly, working in closed rounds will give a super neat finish to the seam at the back, so remember to use a slip stitch to close, then the first stitch of your new round is in the same as the slip stitch.
MATERIALS:
- Approx. 200g Super Chunky Wool (combination of colours as desired)
- 8mm hook
- Needle to weave ends
INSTRUCTIONS: ***UK TERMS***
NOTES: Each CHAIN at the beginning of every row and the SLIP STITCH to close are NOT counted. Your first stitch in each row, will be in the same stitch as the previous slip stitch.
| CH63 (approx. 28” (70cm). When joined, this should just fit over your head. You do not want this to be too loose or else the cowl will not hang close to the neck – so adjust length accordingly) | ||
| 1 | Work in BACK LOOP ONLY, keep tension loose. From 2nd chain on hook 62 SLIP STITCHES, CH1 and turn | = 62 ST |
| 2 | (Continue working in BLO) 62 SLIP STITCHES, CH1 and turn | = 62 ST |
| 3 | (Continue working in BLO) 62 SLIP STITCHES, CH1 and turn You have now completed 3 rows of ribbing. Form a circle and close with SLIP STITCHES. This is now the base for the rest of your stitches to be worked in rounds | = 62 ST |
| 4 | Attach new colour to where the ribbing stitches joined (this will keep you work looking neat) CH1, work in FRONT AND BACK LOOPS, 62 HTC, SLIP STITCH to close | = 62 ST |
| 5 | – 15 REPEAT | = 62 ST |
| 16 | CH1, work in BOTH LOOPS, 62 DC, SLIP STITCH to close | = 62 ST |
| 17 | REPEAT | = 62 ST |
| 18 | CH1, work in BACK LOOP ONLY (creates a nice ridge for the reverse side), 62 HTC, SLIP STITCH to close | = 62 ST |
| 19 | CH1, work in FRONT AND BACK LOOPS, 62 HT, SLIP STITCH to close | = 62 ST |
| 20 | – 29 REPEAT | = 62 ST |
| 30 | Use SLIP STITCH to fasten to the back of the very first row of ribbing. | = 62 ST |
Finishing
The finished chunky cowl measures 14” (35cm) wide and 8” (20cm) long. Taking about 3-4 hours to complete. And oh, my days, it is so thick and cosy.
I was delighted with how this looked and will be making a different colour combination for myself.
Of course, buying the best quality yarn will make all the difference for a project like this, especially one that is close to your neck and face. I have super sensitive skin in the winter so avoid cheap acrylic and polyester yarns.
As a result, my partner absolutely loved the chunky cowl. It looks surprisingly smart too which wasn’t intended. The thickness definitely gave it that extra umpf and it’s great to talk outside when it’s a bit too chilly.
So, if you’re looking for a quick and relatively simple crochet project that’s practical and trendy, I hope this ticks the boxes. Have some fun with this fellow crafters.